Map A Multi Target Lookup Field In Azure Data Factory – Dynamics 365 Data Import

Dynamics 365 has these special lookup fields which can reference multiple entities. Meaning, you can select record not just from one entity but other as well. One of the typical example is an Owner field where you chose a user or a team as well, A customer field where you can chose an account or a contact as well. 

These fields have sister string fields which holds the entity schema name of the record in the main lookup field. i.e. for ownerid field, it will be owneridtype where it will be “systemuser” if owner is an user or “team” if team is the owner. These fields are often referred to as Virtual fields as well. 

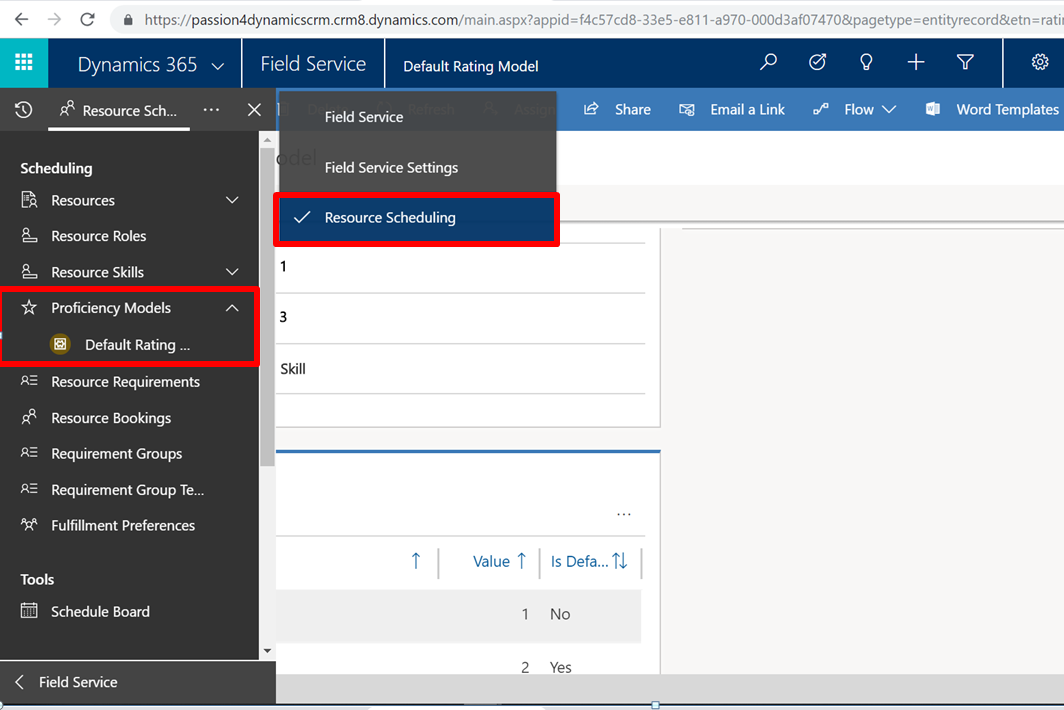
In my case, I will be talking about Notes(Annotation) Entity. Notes can be associated with any entity in the system using the objectid or regarding field to be clear. The corresponding field for this lookup field is objectidtypecode which holds the target entity schema name. 

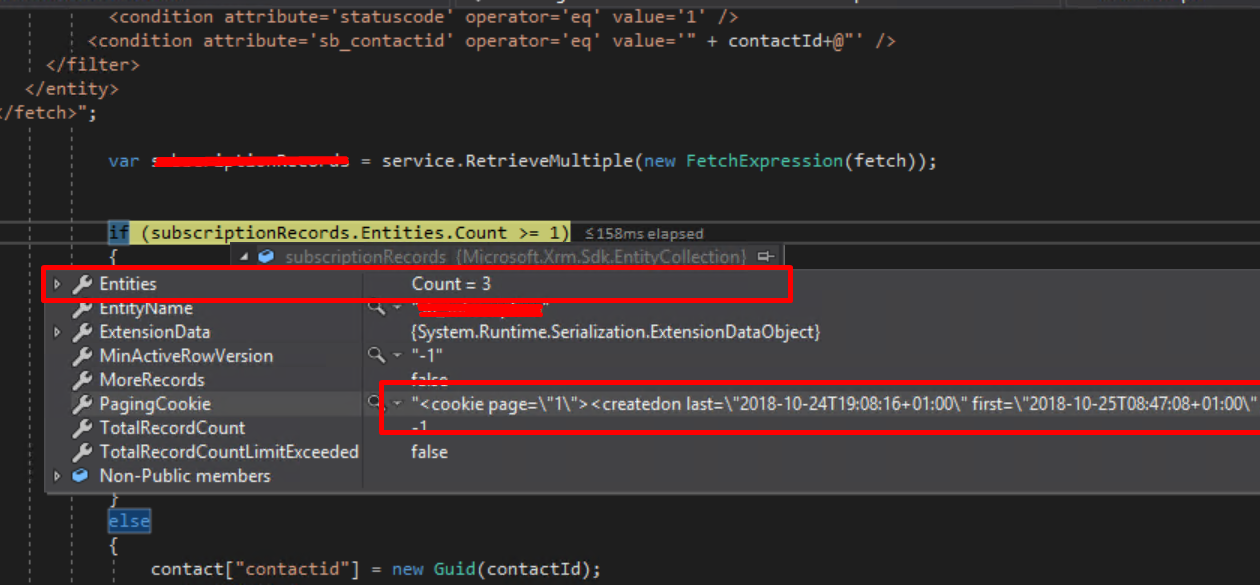
if you simply do the mapping to objectid in your target dynamics instance, you will error like below:

Operation on target Create Annotation failed: Failure happened on 'Sink' side. ErrorCode=DynamicsMissingTargetForMultiTargetLookupField,'Type=Microsoft.DataTransfer.Common.Shared.HybridDeliveryException,Message=Cannot find the target column for multi-target lookup field: 'objectid'.,Source=Microsoft.DataTransfer.ClientLibrary.DynamicsPlugin,'

Even if you map objectidtypecode to objectidtypecode directly, you will get error.

Solution: 
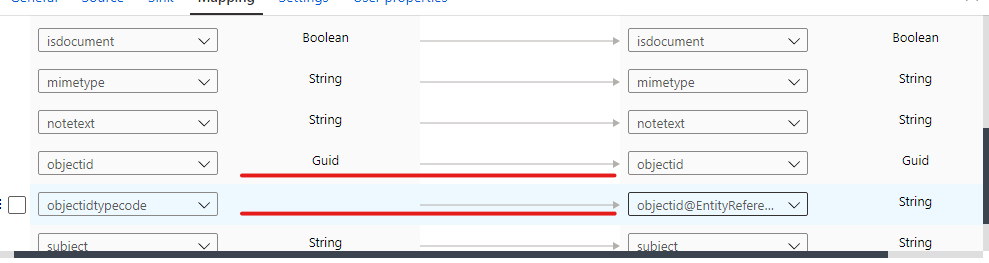
It was not possible to work with multi target fields at all earlier with ADF but now its possible by doing below. so now, you will have to map objectid to objectid(the main lookup field) from source to target. 
Along with that, you have to map objectidtypecode or any field which holds the schema name of the lookup field to an expression as “{lookup_field}@EntityReference”. So in my case it will be objectid@EntityReference.:

And there you go. It will work flawless if you do this. To explore more refer to https://docs.microsoft.com/en-us/azure/data-factory/connector-dynamics-crm-office-365

I hope this helps!

Advertisement

Import Member/Contacts To A Marketing Segment

A segment in 365 for marketing app is an essential feature which lets you create a list of related contacts based on some criteria( similar to advanced find). Later it is used to target customers in a customer journey.

While you can define a criteria/search for contacts and add them in a Dynamic segment, you don’t have this facility in a “Static” Segment because contacts are manually added on a per-contact basis. hence, there should be ability to import these contacts in to a static segment. 

Now, there is no out of the box way I could find by which we can bulk update contacts into a segment, however after doing a bit digging, I found a working custom solution. 

Solution

If you look into segment entity, you will find a mysterious field named “msdyncrm_segmentmemberids” as below:

segment1

This field basically consists of the ids of the contacts in a JSON format prefixed with “crm”:

segment2

Hence, whatever contacts you manually select on the segment comes and sit in this field. So we just need to update this field with ids of the contact we want to include in this segment.

You can update this field either by WebApi or a Plugin. Its upto you how you want to design your solution. In my case I have placed button on the segment form which opens a web resource providing a flexibility to upload an excel/csv file containing these ids of the contacts which you can easily read, prepare the format of the guids(prefix with “crm”) and update using a simple web api request.

 var entity = {};
            var stringIfy = JSON.stringify(Prepared_ContactsArray);
            var entity = {};
            entity.msdyncrm_segmentmemberids = stringIfy;

            var req = new XMLHttpRequest();
            req.open("PATCH", GetGlobalContext().getClientUrl() + "/api/data/v9.1/msdyncrm_segments(" + segmentId + ")", true);
            req.setRequestHeader("OData-MaxVersion", "4.0");
            req.setRequestHeader("OData-Version", "4.0");
            req.setRequestHeader("Accept", "application/json");
            req.setRequestHeader("Content-Type", "application/json; charset=utf-8");
            req.onreadystatechange = function () {
                if (this.readyState === 4) {
                    req.onreadystatechange = null;
                    Xrm.Utility.closeProgressIndicator();
                    if (this.status === 204) {
                        //Success - No Return Data - Do Something
                       
                    } else {
                        //Xrm.Utility.alertDialog(this.statusText);
                    
                    }
                }
            };
            req.send(JSON.stringify(entity));
        }

I hope this helps!

Cheers!

MB2-877 MICROSOFT DYNAMICS 365 FOR FIELD SERVICE MODULE 1 TOPIC – Integrate other tools with Field Service

This is the 6th blog of this series, before this I have created a blog on the topic “Configure additional options”  from Module 1 which you can check here : MB2-877 MICROSOFT DYNAMICS 365 FOR FIELD SERVICE MODULE 1 TOPIC – CONFIGURE ADDITIONAL OPTION

In this blog we will cover up the last topic from the module 1 “Integrate other tools with Field Service

  1. Automate processes by using Microsoft Flows
    In Your field service you can very well take advantage of powerful Microsoft flows which takes traditional workflows to the next level and allows you to automate processes that span multiple systems. Here are some main points:

    a. Build process automation that span systems
    b. Visual designer to compose automations
    c. Connect to services to access data
    d. Built on top of Microsoft Azure Logic Apps
    e. Can be on demand from PowerApps or triggered by event

    To know more about them : https://flow.microsoft.com/en-us/

  2. Build flows using Visual Designer
    You will have a visual designer which you use when designing a flow, in the example below you can utilize a flow for sending an exchange email when a new file is added in drobox to anyone:

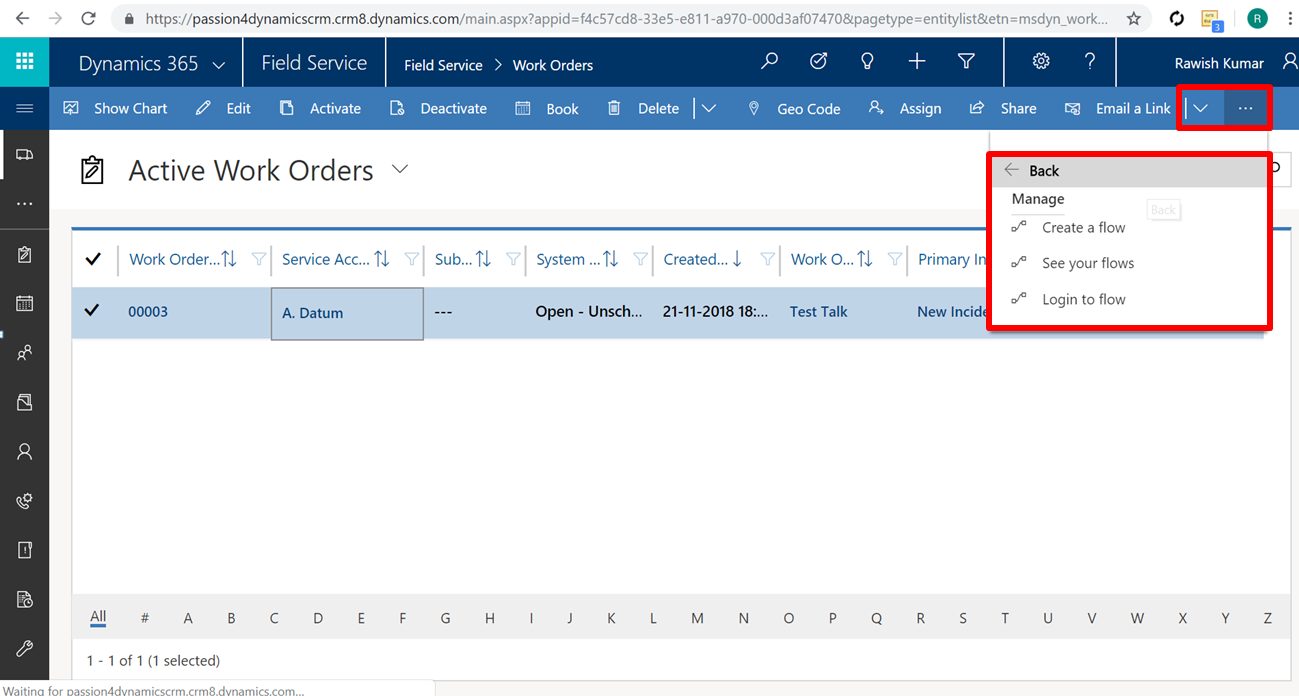
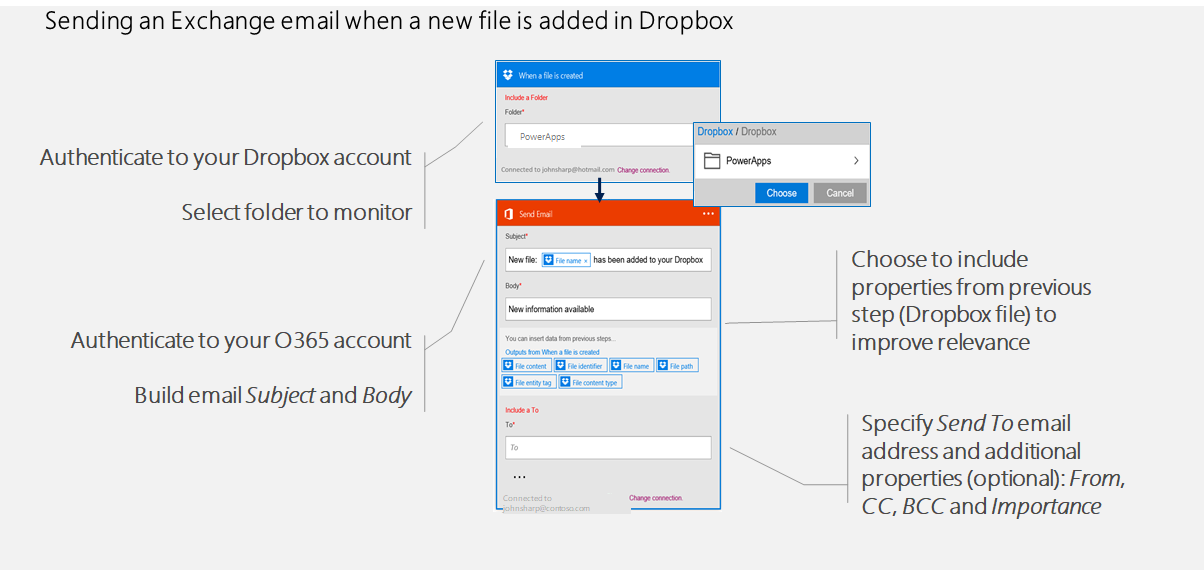
    Apart from it , you get many predefined flow templates that you can use such as an approval process template , getting text messages on work order processes etc.

    You can create a flow or utilising existing ones either from the main entity bar:

    Or direcly by going to microsoft flows app by clicking on the main 365 navigation and by clicking on ‘Flows‘:

  3. Identify uses for the Twilio solution

    Twilio is an API that allows developers to make phone calls means make and receive phone calls programmatically.  It also has an interface that you can use to send and receive text messages using web service APIs. You can have the same capability using Microsoft Flow because Microsoft Flow does interact with the Twilio APIs as well to send SMS messages using Flow, but there is also a Twilio solution that can be downloaded and installed into your Dynamics 365 organization.

    So main points are:
    a. Allows software developers to programmatically make and receive phone calls and send and receive text messages using its web service APIs.

    b. Twilio has a Dynamics 365 Solution that can be installed into an organization (Requires a Twilio Account)

    Download Solution Link:

    https://www.microsoft.com/en-us/download/details.aspx?id=53586

  4. Identify opportunities to integrate Glympse with the Connected Field Service solution.
    The Glympse solution is available through App Source.  If you go into the Dynamics 365 marketplace, you can download and configure the solution. Its integration that enhances Microsoft Dynamics 365 Field Service experiences with live map technician view and appointment ETA.

    The Main points are :

    • Provide real-time notification to techs & customers
    • Notification sent through SMS or email
    • Uses GPS location in Field Service mobile application
    • Can be configured for voice messages
    • Available through App Source

How how these journey would like on the phone:

So, this is the last blog of the Module 1 – “Set Up & Configure Field Service” Which covers 15-20% of the certification.  We have come                  pretty much far but we have long way to go 🙂

I will see you in the next blog with new interesting module : Manage Work Order.

Cheers!

MB2-877 MICROSOFT DYNAMICS 365 FOR FIELD SERVICE MODULE 1 TOPIC – Configure additional options

This is the 5th blog of this series, before this I have created a blog on the topic “Configure bookable resources”  from Module 1 which you can check here :MB2-877 MICROSOFT DYNAMICS 365 FOR FIELD SERVICE MODULE 1 TOPIC – CONFIGURE BOOKABLE RESOURCES

In this blog we will cover up the topic from the module 1 “Configure additional options

  1. Configure territories and organizational units
    You can create territories for your resources in field service.Now, remember that traditionally when you’re using territories with Dynamics 365, you’re really just dealing with one territory per resource.  But in this situation, a resource might service multiple territories.  So I do have the capabilities to add multiple territories in here based upon my specific situation. To add a territory go from field service > Field Service Settings  > Territory :
    Click on “Add new territory” and fill out below information such as “name” and manager which is optional:

    Once you save and close this territory now you can go and assign this to your resource by following below steps. Open Resource and click on “Related” Tab and select “Resource territory.” Finally say add a new resource territory which will help you to use the recently created territory:

    Save and close:

    Organizational Units.
    Below are the main points on organization units before we configure them:
    a. They are Different from Business Units

    b. Organizational units represent how your consulting company categorizes its different businesses.

    c. Each Organizational Unit can have Latitude and Longitude define to assist in the scheduling process.

    To Configure an orgnizational units go from field service > Resource Scheduling >  Organization Units and click on add new organization unit:

    Add below information and save and close. Later you associated this with a resource:


  2. Identify skills types
    Now when you are setting up your resource you might want a placeholder to say this resource has this skill i,e a consultant or technician etc.  To Define a skill or characteristic for a resource  go From Field Service > Resource Scheduling > Resource Skill and click on New > Add required field such as name of the skill and select the type as “Skill” > click on save and close:

    Post this this, it will be available to be associated to the resource. from your resource click on ” Field Service” Tab and in the “Resource Characterstics” Subgrid , click on New. Look for the skill that we have created and click on Save:

  3. Configure characteristics and skills & Configure proficiency models below are useful points about characteristics/Skill:
    a. Skills / Characteristics are used to define areas in which resources are proficient

    Can be broken into two types:

    • Skill
    • Certification

     b. Used with proficiency models to denote a specific skill level in an area.

     c. Proficiency model is look up to additional values can be added or removed.

    Configuration:
    Before configuring Characteristics and skills we will first have to define a proficiency model as this is linked to a skill. You can configure a new one but i am going to use standard out of the box rating model by going to field service > Resource Scheduling > Proficiency Model:

    Open the default existing model and you will field like min and max rating and also a sub grid below which actually tells the rating:

    Now if you want to lets say customize it and would like to add a new rating ‘Expert’ what you will have to do is first make the max rating to ‘4’ so that 4 rating can be added. To that and save the record and what it does it add 4 options to the  grid and ask you to enter the names for 4 rating:

    select each rating and edit the label and we are ready to go and configure a characteristic to do this follow the steps given in the 2nd step above ‘Identify a skill type’ wherein i have added a characteristic as ‘Technical Consultant’.  Now if you go to resource and add characteristic for it you will add the skill as ‘technical consultant’ and rating value as well which we defined.

    One Important Point : We have been talking about Characteristic & Skill alot but on the grounds these two are exactly the same so dont get confused.

  4. Implement resource roles and categories
    This option allows you to define what specific roles that a particular resource is going to play inside your organization.  few points:

    a. Define the role that a resource can play within an organizationb. Can be used for filtering on the Schedule Board

    c. Often used with Project Service Automation to define generic place holders for needed resources on projects

    To add a Resource Role/Category, go from field service > Resource Scheduling >  click on Resource Roles:

    add below information such as name, I have taken as ‘trainee‘ and other details such as utilization and Billing Type etc and click on save &  close:

    Now you will be able to associate this to a resource.

    One Important Point : We have been talking about Roles & Category alot but on the grounds these two are exactly the same so dont get confused.

  5. Explain differences between organizational units and business units They are very much different. The major difference between them is that a traditional business unit drives the security structure of you dynamics crm however an organizational unit is just a placeholder for categorization  of your business.
    That’s it for this blog, I will see in the last topic of this module in the next blog.

    —————————————————————————————–

Get Most Recent Created On Record from Retrieved Entity Collection In Plugin

Sometimes, you may have a requirement to get the most recently created on record from the entity collection you have retrieved.

Instead of playing around a lot with coding and .net stuff, Dynamics CRM fetch XML and QueryExpression provides a way to sort records Ascending or descending.

Therefore, While retrieving records in FetchXML, do this :

<entity name='entityname'>
 <attribute name='atrributename1' /> 
   <attribute name='atrributename2' />    
    <attribute name ='attributename3' />                       
      <order attribute='createdon' descending='true' /> 
     <filter type='and'>                                  
     <condition attribute='statecode' operator='eq' value='0' />
   </filter>
</entity>

Or in Query Expression:

QueryExpression qe = new QueryExpression(entityName);
FilterExpression fe = new FilterExpression();
qe.ColumnSet = new ColumnSet(true);
qe.Orders.Add(new OrderExpression(columnname, ordertype)); 
service.RetrieveMulti ple(qe);


when Execute them , you will get the desired record on the top which can be access by simply by doing retrievedResult[0] or :

firstRecord= retrievedResult.Entities.First(); //first method.

firstrecord

I hope this helps!

cheers!


Retrieve Audit History Changes For A Particular Field/Attribute Of A Record

Description:

Sometimes we have a requirement to retrieve audit history changes for a particular field in CRM which may be for the purpose of checking if for e.g field A value which is at the moment set to “10”, was ever “5” or may be “3” or may be use old those values of fields to create a new CRM Record. In the below Image , you can easily retrieve old and new values at any given time on birthday field by looping on each audit record:

audit1

I have taken the reference from Dynamics CRM SDK & MSDN to figure out how this can be achieved.

Please note : To be able to use this you must have Auditing enabled on all three areas of CRM.

1. Auditing for whole Organization should be already turned on.

2. Auditing for Entity Should be already turned on.

3. Auditing for that Field should already be turned on.

Solution Code:

I have accomplished this on a console application , you can do it in plugins or custom workflows as per the requirement.

Required :

Namespace:   Microsoft.Crm.Sdk.Messages

Assembly:  Microsoft.Crm.Sdk.Proxy (in Microsoft.Crm.Sdk.Proxy.dll)

try
   {
//initiate a new retrieve request & add entity logical name + Guid of the record to retrieve
    RetrieveRecordChangeHistoryRequest changeRequest = new RetrieveRecordChangeHistoryRequest();
    changeRequest.Target = new EntityReference("contact", Id);                RetrieveRecordChangeHistoryResponse changeResponse =

//Execute the request, the "details" variable will have the audit data. 
    (RetrieveRecordChangeHistoryResponse)_service.Execute(changeRequest);
    AuditDetailCollection details = changeResponse.AuditDetailCollection;

// Retrieve Particular attribute change history by passing entity logical
//name and guid of the record, finally execute using RetrieveRecordChangeHistoryResponse
    var attributeChangeHistoryRequest = new RetrieveAttributeChangeHistoryRequest
      {
           Target = new EntityReference("contact", Id),
           AttributeLogicalName = "birthday"

       };

     var attributeChangeHistoryResponse = (RetrieveAttributeChangeHistoryResponse)_service.Execute(attributeChangeHistoryRequest);
     details = attributeChangeHistoryResponse.AuditDetailCollection;

//Details will have many records for example birthday change records, loop through all of them
       foreach (var detail in details.AuditDetails)
         {
             var detailType = detail.GetType();
             if (detailType == typeof(AttributeAuditDetail))
                  {
// retrieve old & new value of each action of each audit change from AttributeAuditDetail
                var attributeDetail = (AttributeAuditDetail)detail;
                foreach (KeyValuePair<string, object> attribute in attributeDetail.NewValue.Attributes)

                        {

                        string oldValue = "(no value)", newValue = "(no value)";
                        if (attributeDetail.OldValue.Contains(attribute.Key))

                       oldValue = attributeDetail.OldValue[attribute.Key].ToString();
                       newValue = attributeDetail.NewValue[attribute.Key].ToString();

                       if (oldValue !=null & newValue!=null)
                            {
                             // Do Something here!
                            }
                        }
                    }
                }
            }
            catch (Exception ex)
            {
                throw new Exception(ex.Message);
}

I hope this helps!

How to use Configuration Migration / Data Migration Utility in Dynamics CRM

Explore Dynamics CRM

In this blog i will detail on using Configuration Migration/ Data Migration utility. This can be used to move the configuration data from one CRM environment to other. generally Configuration data is used to defines custom functionality in CRM, which is typically stored in custom entities.

Often we need to migrate configuration data from one CRM environment to other, especially test data, master data setup etc. Microsoft provided an excellent tool for doing this.

Following are the benefits of using this tool,

  1. allows you to select entity and fields from where you want to export the configuration data.
  2. large amount of data from multiple entities can be moved from one crm environment to other.
  3. Data can be imported using the same GUID’s as that of the source system, hence lookup references to imported records will be valid.
  4. Schema file can be reused to export data from different source environments.

Below…

View original post 718 more words