The ‘Mysterious’ Customer Journey Entity In Dynamics 365 Marketing

In today’s blog I am going to be talking about ‘Customer Journey’ entity in dynamics 365 for marketing app or to be specific the ‘Customer Journey Designer’ which looks like below:

customerjourney1


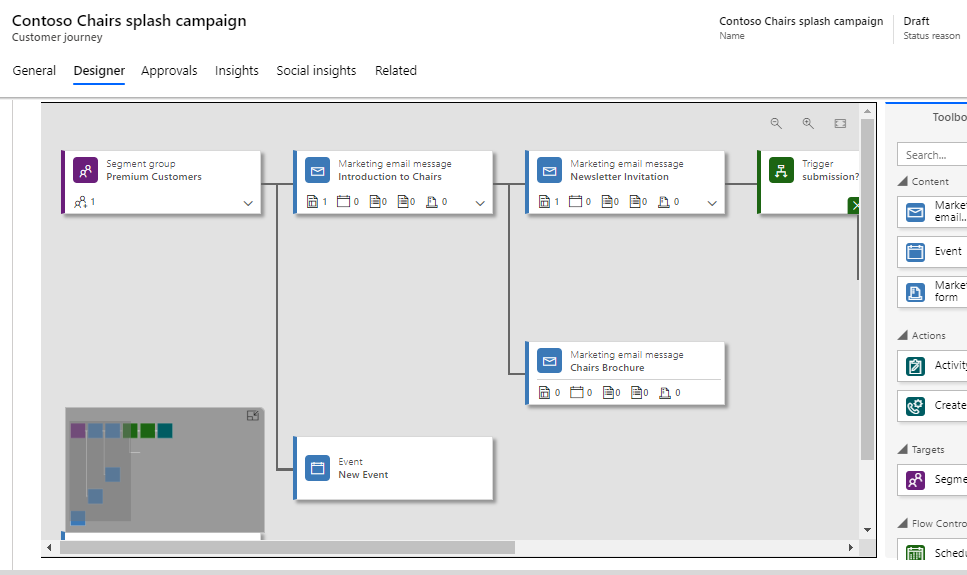
I call it ‘Mysterious’ because whatever happens in the journey ‘stays’ in the customer journey. i.e there is no way or its difficult to get the segment/contents being used in it. I am talking about Marketing Email, Marketing Page, Marketing Form etc. The question you might want to ask is why would I need that information? well, because of may be below:

  1. You might have some validations on the content you can use in the customer journey
  2. You might want to retrieve the data for reporting purpose

If you look into the relationships from customer journey to these entities, you wont find anything hence it gets difficult to retrieve these records or perform operations. In short Dynamics 365 Marketing works a little differently then our typical dynamics 365.

Whatever happens inside a customer journey designer sits in a field on this entity named as “msdyncrm_workflowdefintion“. It stores information about content added in this the journey in JSON format. 

customerjourney2

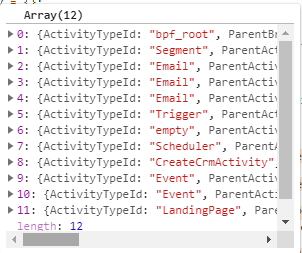
This is how it looks:
customerjourney3


Let’s understand what this JSON means:

  1. Each content is stored in a node called “ActivityTypeId“.
  2. The Id of the content is stored in property “Itemid“.
  3. To identify the type of content such as Marketing page form etc. refer to below table because it uses different names to each type of content:

Dynamics Entity Name Internal Name In Customer Journey
Marketing Page LandingPage
Marketing Form MarketingForm
SurveySurvey
Marketing EmailEmail
Marketing Event Event
Marketing SegmentSegment

If you debug and parse this field data into JSON, looks like something below:

customerjourney4

So when you retrieve/query this field, you have to loop through these JSON nodes and do validation using the Guids of these records like in the below example of Javascript:

 var workflowDefintion= formContext.getAttribute("msdyncrm_workflowdefinition").getValue();
 var workflowDefintionData = JSON.parse(workflowDefintion); //Parse it

                    var nodeLength = workflowDefintionData.length;
                    for (var i = 0; i < workflowDefintionData.length; i++) {
                        var node = workflowDefintionData[i];                        
                        /* Check if node is a Marketing page*/                       
                        if (node.ActivityTypeId === "LandingPage" && (i + 1) === nodeLength) {

// Perform Operations here
}

Same way you can do in the code if needed.

I hope this help!

Cheers!

Advertisement

MB2-877 Microsoft Dynamics 365 for Field Service Module 1 Topic – Configure bookable resources

This is the 4th blog of this series, before this I have created a blog on the topic “configure products and services pricing”  from Module 1 which you can check here : MB2-877 MICROSOFT DYNAMICS 365 FOR FIELDSERVICE MODULE 1 TOPIC – CONFIGURE PRODUCT AND SERVICE PRICING In this blog we will cover up the topic from the module 1 “Configure bookable resources
  1. Identify Fields for bookable resources Let’s understand what is a bookable resource, well, a bookable resource in Field Service is anything that you’re going to need to carry out a work order.  Now, it could be a user, so an employee of your organization that is actually going to go out in the field and work through something. And it doesn’t necessarily have be a person it could be anything in field service. To create a bookable resource ,from your field service >click on “Resource Scheduling” and then on “Resources”:
  2. below the are main fields that needs defining when creating a bookable resource:       Resource Type – Can be of type User or Contact or Account etc. Skills & Certifications – Resource Skills and achievements Roles & Categories –  Resource’s Roles Working Schedule – Resource’s work routine i,e start & end time. Hourly Rate – Resource’s Charges.   Location Information –  Work start and end location.   Schedule Board Display Options –  Yes/No Territory Information –  Territory a resource belongs to.
  3. you will have to complete all this information here on the different tabs available below such as “project service”, “field service” & Scheduling:
  4. Enable mapping functionality You can enable mapping functionality which is a concept of geo location, making sure that, when a work order is created, that we understand the exact physical location of where that work order is to be executed from a service technician perspective. By default this is Disabled in field service + Project Automation.
  5. To Enable go to from Field Service > Resource Scheduling > Administration and click on Scheduling Parameters:
  6. Change “Connect to Maps” field to “Yes”. Once you do that you will be presented with a warning popup. Click okay and the mapping functionality will be enabled.
  7. Identify entities that are geocoded Out of the box, accounts and work orders are all geo located to ensure that they are physically tied to an actual, mappable address that can be used through like Bing Maps or Google Maps or something similar to that functionality.
  8. To see this open an account and from ribbon navigation click on “Geo Code“:
  9. It will then actually try to map the address given on this account to an actual physical address on the map and give you suggestion. select and click okay and save the account.
  10. Define start and end location for resources  & Identify differences between address types A resources might physically start their day at the office.  So it might be a situation where the technician’s going to come into your office.  Once they come into your office, they’re going to get the all the accessories they need for that particular day, their stack of work orders, and then they’re going to head off into the office.  So with the option of start and end location you will be able to map your routing information based upon where they start their day.  So if they start their day at the office, you know that that’s how you want to work through it.  The other option could be that they’re starting their day from their physical resource address.
  11. To define this – follow step  1 given above for creating a bookable resource and go to “Scheduling” tab:
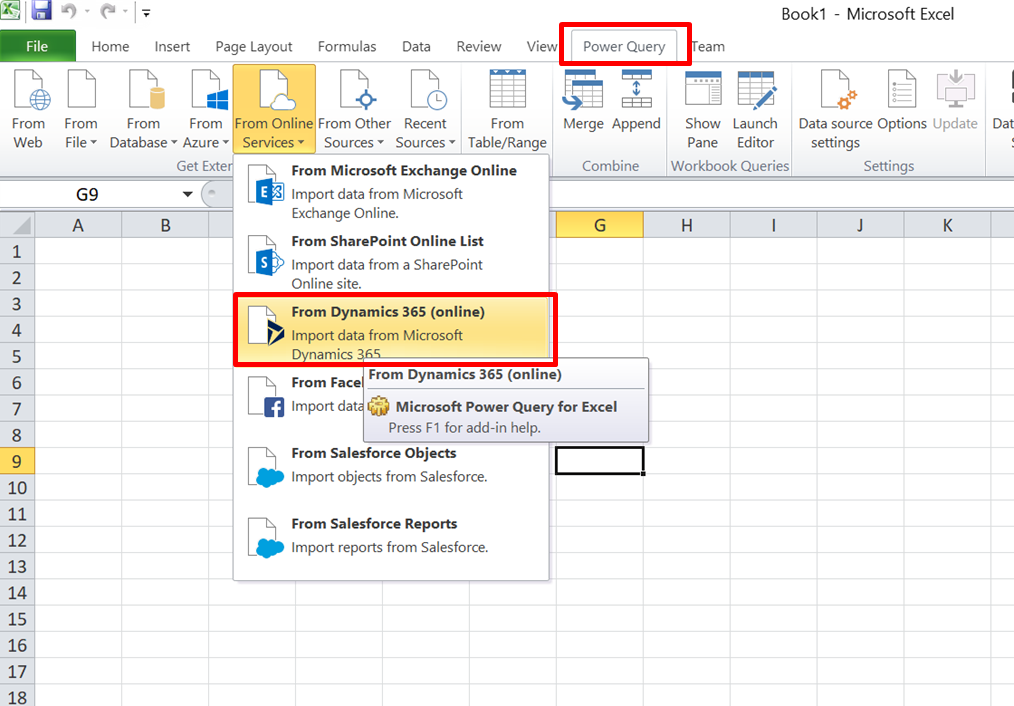
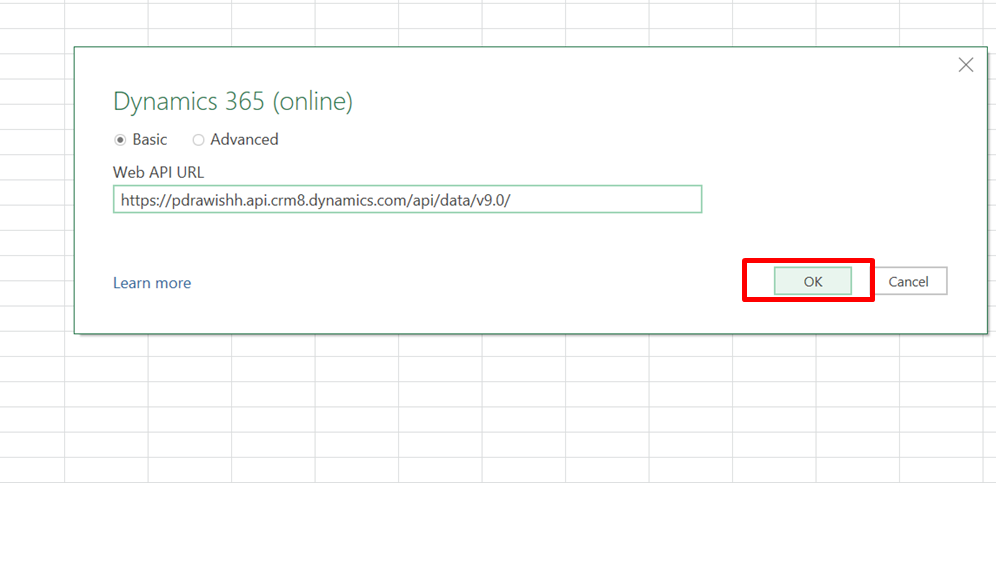
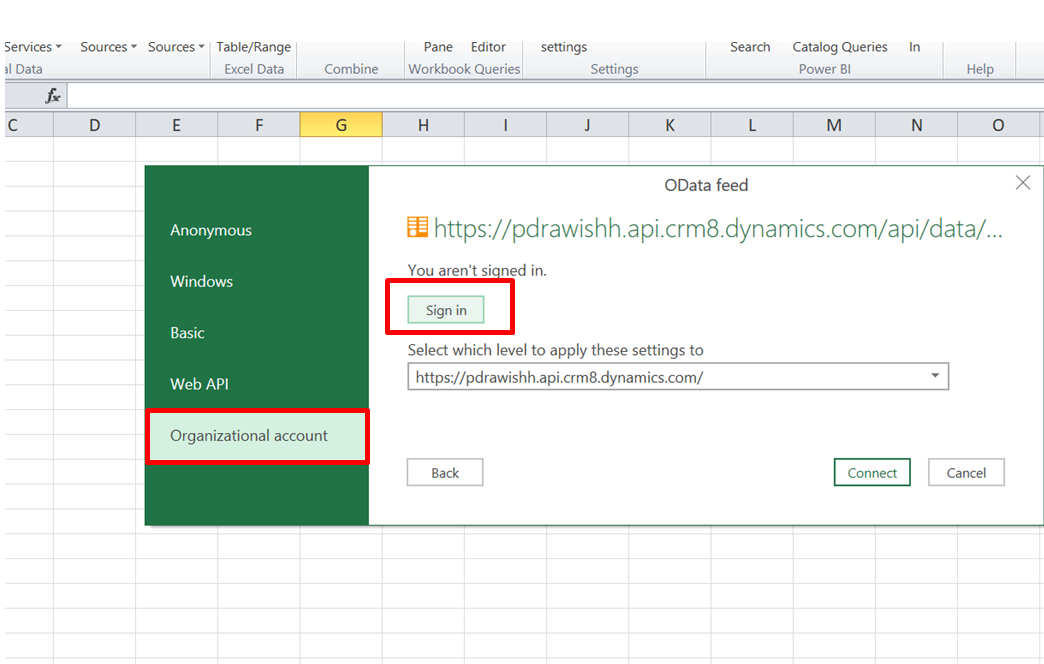
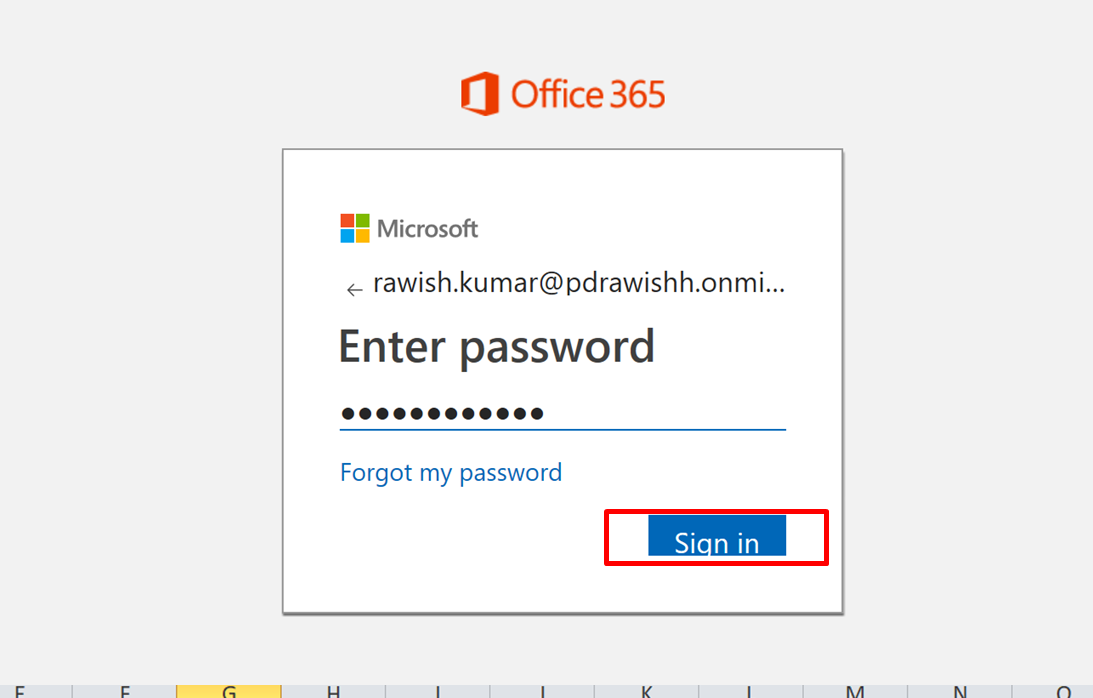
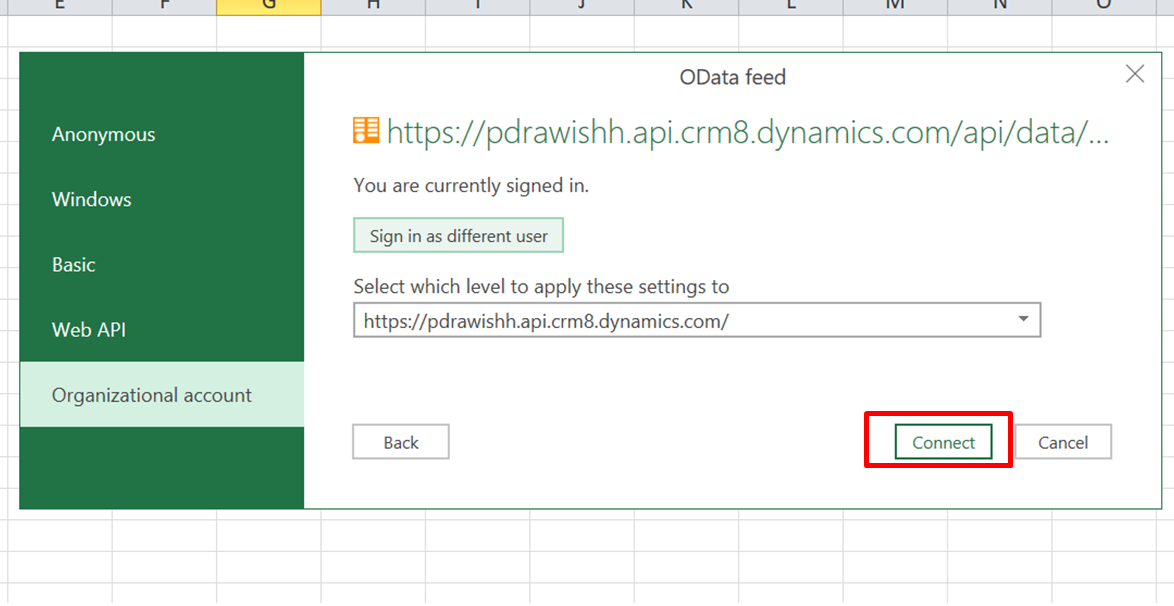
  12. you get couple of option which means as below:
  13.  a. Resource start and end locations are used to help plot a                             resource’s daily route
  14.    b. Start and end locations can be defined as:
    •  Location Agnostic: Does not have a defined address
    • Resource Address: Uses the address defined for the resource
    • Organizational Unit Address: Uses the address defined on the resources organizational unit
  15.   c. Address play a direct role in whether a resource is suggested for           a Work Order in the Schedule Assistant
  16. So, this is it – i will see you in the next blog.

MB2-877 Microsoft Dynamics 365 for Field Service Exam Overview

I have been planning for this certification since quiet a while now. I am very much attracted towards the field service addition to dynamics CRM hence I decided to finally schedule the exam.

So will be preparing for this exam for next couple of weeks & as I go, I will be creating blogs on my study for this exam. I will try to put as much as details and explanation to understand the concepts.

The blog series will be fully aligned with the exam pattern given on the Microsoft learning page:

1.png

Visit this page here :  https://www.microsoft.com/en-us/learning/exam-mb2-877.aspx & familiarize yourself with this exam.

What will you get out of this exam?

Well, I should have wrote this question in the beginning of this blog but it is not too late to talk about this now!
If you have a client which very much customer oriented and does a lot field work such as proving services as at home such as Instillation, uninstallation, fix/repair/service of the products that company offers,  The field service module of dynamics CRM is perfect for them. Hence you have to have knowledge on this module of dynamics CRM.

I am very much excited to start the series and hope so are you.
In the next and very first blog, We will go through the the first main topic “Perform Initial Configuration Steps”  from Set up and Configure Field service module.

2.png

So, I will see you in the next blog shortly! Make sure you subscribe to my blogs to get notified on next blogs!

How to use Configuration Migration / Data Migration Utility in Dynamics CRM

Explore Dynamics CRM

In this blog i will detail on using Configuration Migration/ Data Migration utility. This can be used to move the configuration data from one CRM environment to other. generally Configuration data is used to defines custom functionality in CRM, which is typically stored in custom entities.

Often we need to migrate configuration data from one CRM environment to other, especially test data, master data setup etc. Microsoft provided an excellent tool for doing this.

Following are the benefits of using this tool,

  1. allows you to select entity and fields from where you want to export the configuration data.
  2. large amount of data from multiple entities can be moved from one crm environment to other.
  3. Data can be imported using the same GUID’s as that of the source system, hence lookup references to imported records will be valid.
  4. Schema file can be reused to export data from different source environments.

Below…

View original post 718 more words

When To Use Which Microsoft Dynamics CRM Web Service

thiking kid

Meet Jerry, he is wondering about dynamics crm services, In this blog I am helping him to understand when he should use which dynamics CRM web service.

Let’s first understand how many services dynamics crm offers post which will discuss which service to be used when:

  1. Web API
  2. Organization Service
  3. Organization Data Service
  4. Discovery Service
  5. Deployment Service

Web API

WebAPI is fairly new for dynamics CRM and i see many developers havent touched upon it. You should be using WebAPI Service while doing Client side development(preferably) such as Javascript, HTML etc. At this point its not easy to use WebAPI on server side but i am sure it will be possible in coming updates. Web API uses ODATA (Open data protocol). It also doesnt need any dynamics CRM related libraries or assemblies. You perform CRUD operation using XmlHttpRequests.  

Organization service

Organization service is basically a SOAP endpoint of dynamics crm and have been available since dynamics crm version 2011.  This Service has to be used with .Net Framework and for Business logic that runs in plug-ins or workflow assemblies on the server expect to use the Organization service.( So nothing client side). To work with Organization you have to use microsoft dynamics crm SDK i,e provided libabries and assemblies to interact with dynamics crm.

Organization Data service

It is also known as Odata service for dynamics crm which is Infact nothing but a “REST” Endpoint. You can utilise Odata endpoint in C# code( a server side code as well) but it is widely used for for client side scripting using javascript. However this has been deprecated with the release of dynamics crm 365 which means it is no longer supported. and completely replace with WebAPI.


Discovery web services

As the name suggest, this service should be used when you have mutiple CRM instances of dynamics crm in single deployment. You would use this service in your plugins ( the server side code) to get the current instance obtain the context.


Deployment web service

This service is barely used by developer as UI options are available. Such as Deployment manager etc. Use this service if you have create , delete or edit a dynamics crm organization/instance. Again its all server side.


I hope this clears your doubt as to when you would use which service and with what programming language.

Cheers!


Error While Connecting To CRM Online Using Kingsway SSIS Connector

Issue:

I have recently got this error when i was preparing an SSIS package for Dynamics CRM 365 Online and used Kingsway SSIS connector.

Kingsway1

Resolution:

After digging in further this error is mainly caused by the request and reponse timings,So, when i checked i found out my system time was somehow 5 minutes ahead of the current time, hence the request going to CRM server was of a future time and hence this error showed up.

All i had to do is fix my system time. Sometimes even if your system time is fine, you might still get the error, In that scenario too try to change the time as 5 minutes less.


Once i did that -my organisation name popped up without any issue.
kingsway2.png


Hope this helps!

Cheers!


An unsecured or incorrectly secured fault was received from the other party

Issue :

Recently i have encountered this error when i was trying to connect to Dynamics CRM 365 online.

error1.PNG


I digged in further and found a post where couple of suggestions were mentioned :

https://community.dynamics.com/crm/f/117/t/204264

Solution : It was to do with my system settings(Time) – my system time was ahead of the server time. which means the request was going to server with a future time. 

hence i have changed the time in my system clock to be 5 minutes less. Which indeed worked.


I hope this helps!

Connect to Dynamics CRM 365 Online from Excel [Reporting]

I have seen a few blogs on how to connect to dynamics crm but most of them talks about connect with Odata endpoint. However with dynamics 365, Odata has  been deprecated hence you cannot use them and will get error.

Below is the step by step process to connect to dynamics crm 365 online from Excel.

  1. If you do not have power query option in your excel or its an old version. Please download the excel addin from here : https://www.microsoft.com/en-us/download/details.aspx?id=39379   and run the setup chose 32 or 64bit as per your excel.
  2. Once done, Launch Excel and select “Power Query” Tab –>”From Online Services” Option  and select “From Dynamics 365(Online) from the dropdown.
    1.png
  3. In the next tab add Web Api endpoint of your online CRM ( you can find it from Customizations–>Developer Resources–>Copy “Instance Web API” url and paste it below:
    2
  4. In the next authentication screen – select “Organizational Account” and then click on “Sign In”.
    3
  5. Following step 4 will take you to your organization sign page. Enter username and password and click Sign In.
    4.PNG
  6. If Signed In successfully; you will be landed back to the authentication page. Click “connect”.5.PNG
  7. Post this you will be presented with the connected org details( such as entities etc).
    6
    7.PNG
    I hope this helps.

Count Total Subgrid Records in Dynamics CRM using JavaScript

In one of my previous blog I explained,how a rollup field can be used to count child records : Count the number of related child records using a Rollup field

However, Rollup field is calculated with an Async System Job, therefore, if you need something to be triggered on every form load; you will have to write a JS.

Here is a quick code to count the number of related sub-grid record on a form onload. You can put an alert of the count or add that number to a field.

function getTotalGridRecordCount() {
 debugger;
 try {

setTimeout(function () {
 if (Xrm.Page != null && Xrm.Page != undefined && Xrm.Page.getControl("contactopportunitiesgrid") != null && Xrm.Page.getControl("contactopportunitiesgrid") != undefined) {
 var count = Xrm.Page.getControl("contactopportunitiesgrid").getGrid().getTotalRecordCount();
 alert("Total Opportunities:"+count);

}
 }, 5000);
 }
 catch (e) {
 Xrm.Utility.alertDialog(functionName + "Error: " + e.message || e.description);
 }
}

Add script to the form and call this function on Onload event. Open the form to see it in action:

1


Hope this helps! cheers!