MB2-877 MICROSOFT DYNAMICS 365 FOR FIELD SERVICE MODULE 1 TOPIC – Integrate other tools with Field Service

This is the 6th blog of this series, before this I have created a blog on the topic “Configure additional options”  from Module 1 which you can check here : MB2-877 MICROSOFT DYNAMICS 365 FOR FIELD SERVICE MODULE 1 TOPIC – CONFIGURE ADDITIONAL OPTION

In this blog we will cover up the last topic from the module 1 “Integrate other tools with Field Service

  1. Automate processes by using Microsoft Flows
    In Your field service you can very well take advantage of powerful Microsoft flows which takes traditional workflows to the next level and allows you to automate processes that span multiple systems. Here are some main points:

    a. Build process automation that span systems
    b. Visual designer to compose automations
    c. Connect to services to access data
    d. Built on top of Microsoft Azure Logic Apps
    e. Can be on demand from PowerApps or triggered by event

    To know more about them : https://flow.microsoft.com/en-us/

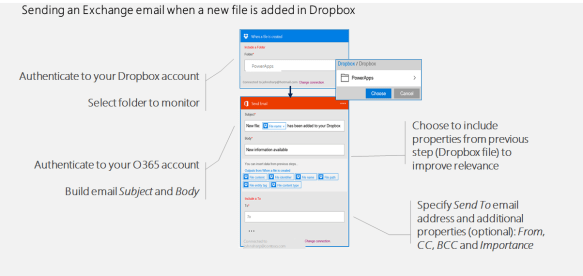
  2. Build flows using Visual Designer
    You will have a visual designer which you use when designing a flow, in the example below you can utilize a flow for sending an exchange email when a new file is added in drobox to anyone:

    Apart from it , you get many predefined flow templates that you can use such as an approval process template , getting text messages on work order processes etc.

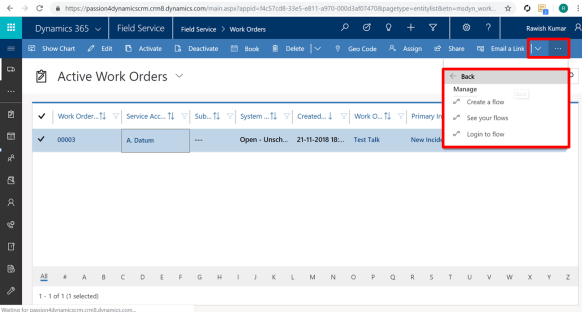
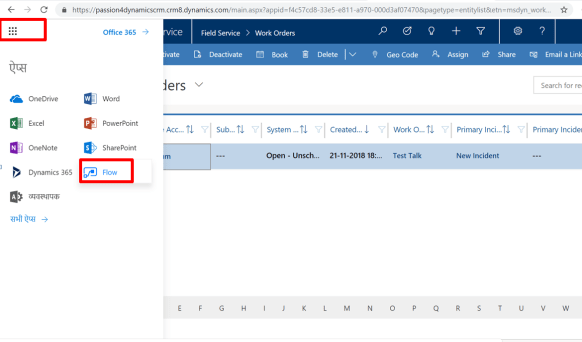
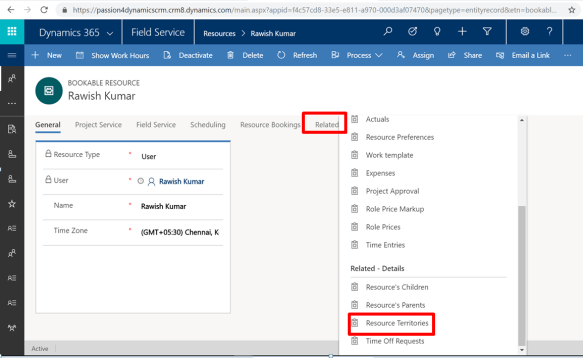
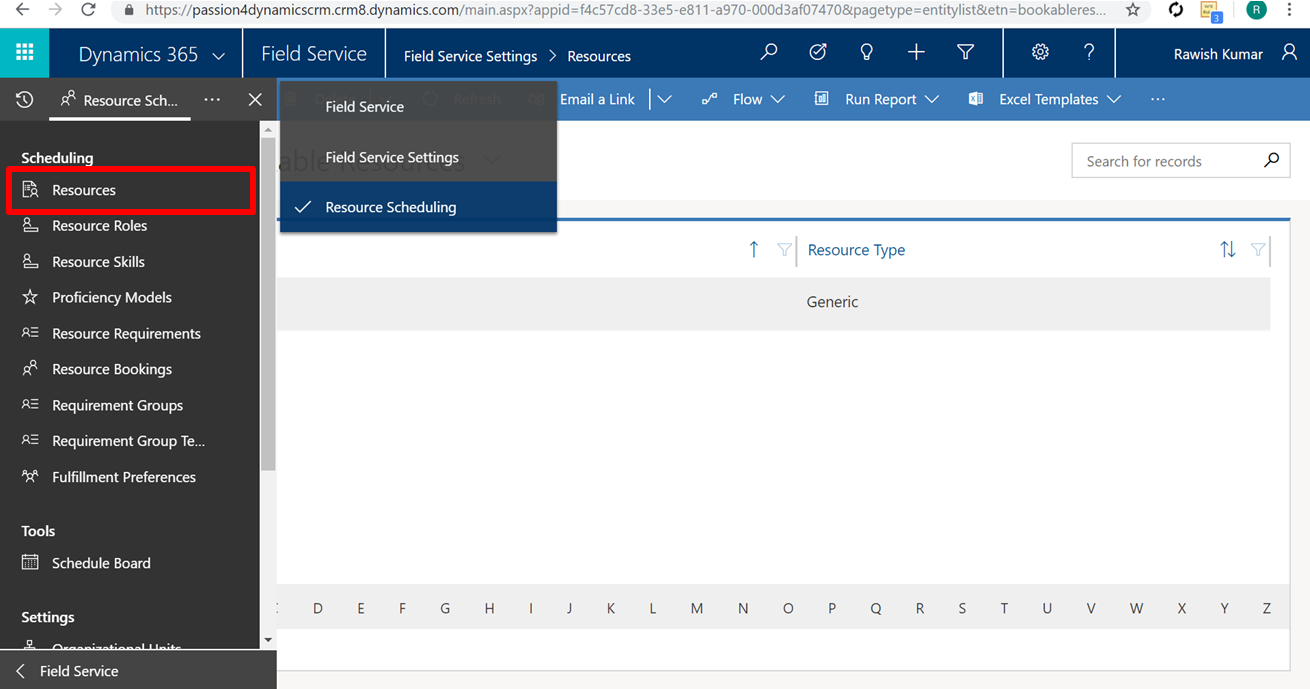
    You can create a flow or utilising existing ones either from the main entity bar:

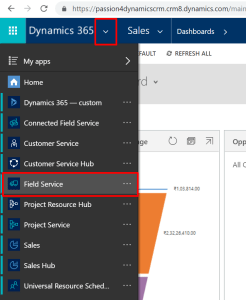
    Or direcly by going to microsoft flows app by clicking on the main 365 navigation and by clicking on ‘Flows‘:

  3. Identify uses for the Twilio solution

    Twilio is an API that allows developers to make phone calls means make and receive phone calls programmatically.  It also has an interface that you can use to send and receive text messages using web service APIs. You can have the same capability using Microsoft Flow because Microsoft Flow does interact with the Twilio APIs as well to send SMS messages using Flow, but there is also a Twilio solution that can be downloaded and installed into your Dynamics 365 organization.

    So main points are:
    a. Allows software developers to programmatically make and receive phone calls and send and receive text messages using its web service APIs.

    b. Twilio has a Dynamics 365 Solution that can be installed into an organization (Requires a Twilio Account)

    Download Solution Link:

    https://www.microsoft.com/en-us/download/details.aspx?id=53586

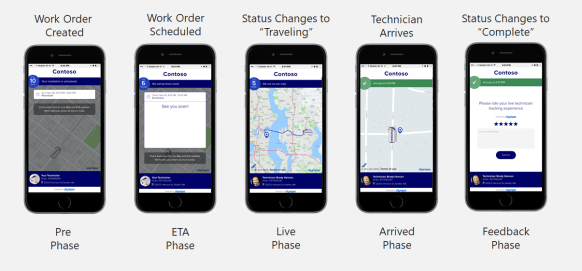
  4. Identify opportunities to integrate Glympse with the Connected Field Service solution.
    The Glympse solution is available through App Source.  If you go into the Dynamics 365 marketplace, you can download and configure the solution. Its integration that enhances Microsoft Dynamics 365 Field Service experiences with live map technician view and appointment ETA.

    The Main points are :

    • Provide real-time notification to techs & customers
    • Notification sent through SMS or email
    • Uses GPS location in Field Service mobile application
    • Can be configured for voice messages
    • Available through App Source

How how these journey would like on the phone:

So, this is the last blog of the Module 1 – “Set Up & Configure Field Service” Which covers 15-20% of the certification.  We have come                  pretty much far but we have long way to go 🙂

I will see you in the next blog with new interesting module : Manage Work Order.

Cheers!

Advertisement

MB2-877 MICROSOFT DYNAMICS 365 FOR FIELD SERVICE MODULE 1 TOPIC – Configure additional options

This is the 5th blog of this series, before this I have created a blog on the topic “Configure bookable resources”  from Module 1 which you can check here :MB2-877 MICROSOFT DYNAMICS 365 FOR FIELD SERVICE MODULE 1 TOPIC – CONFIGURE BOOKABLE RESOURCES

In this blog we will cover up the topic from the module 1 “Configure additional options

  1. Configure territories and organizational units
    You can create territories for your resources in field service.Now, remember that traditionally when you’re using territories with Dynamics 365, you’re really just dealing with one territory per resource.  But in this situation, a resource might service multiple territories.  So I do have the capabilities to add multiple territories in here based upon my specific situation. To add a territory go from field service > Field Service Settings  > Territory :
    Click on “Add new territory” and fill out below information such as “name” and manager which is optional:

    Once you save and close this territory now you can go and assign this to your resource by following below steps. Open Resource and click on “Related” Tab and select “Resource territory.” Finally say add a new resource territory which will help you to use the recently created territory:

    Save and close:

    Organizational Units.
    Below are the main points on organization units before we configure them:
    a. They are Different from Business Units

    b. Organizational units represent how your consulting company categorizes its different businesses.

    c. Each Organizational Unit can have Latitude and Longitude define to assist in the scheduling process.

    To Configure an orgnizational units go from field service > Resource Scheduling >  Organization Units and click on add new organization unit:

    Add below information and save and close. Later you associated this with a resource:


  2. Identify skills types
    Now when you are setting up your resource you might want a placeholder to say this resource has this skill i,e a consultant or technician etc.  To Define a skill or characteristic for a resource  go From Field Service > Resource Scheduling > Resource Skill and click on New > Add required field such as name of the skill and select the type as “Skill” > click on save and close:

    Post this this, it will be available to be associated to the resource. from your resource click on ” Field Service” Tab and in the “Resource Characterstics” Subgrid , click on New. Look for the skill that we have created and click on Save:

  3. Configure characteristics and skills & Configure proficiency models below are useful points about characteristics/Skill:
    a. Skills / Characteristics are used to define areas in which resources are proficient

    Can be broken into two types:

    • Skill
    • Certification

     b. Used with proficiency models to denote a specific skill level in an area.

     c. Proficiency model is look up to additional values can be added or removed.

    Configuration:
    Before configuring Characteristics and skills we will first have to define a proficiency model as this is linked to a skill. You can configure a new one but i am going to use standard out of the box rating model by going to field service > Resource Scheduling > Proficiency Model:

    Open the default existing model and you will field like min and max rating and also a sub grid below which actually tells the rating:

    Now if you want to lets say customize it and would like to add a new rating ‘Expert’ what you will have to do is first make the max rating to ‘4’ so that 4 rating can be added. To that and save the record and what it does it add 4 options to the  grid and ask you to enter the names for 4 rating:

    select each rating and edit the label and we are ready to go and configure a characteristic to do this follow the steps given in the 2nd step above ‘Identify a skill type’ wherein i have added a characteristic as ‘Technical Consultant’.  Now if you go to resource and add characteristic for it you will add the skill as ‘technical consultant’ and rating value as well which we defined.

    One Important Point : We have been talking about Characteristic & Skill alot but on the grounds these two are exactly the same so dont get confused.

  4. Implement resource roles and categories
    This option allows you to define what specific roles that a particular resource is going to play inside your organization.  few points:

    a. Define the role that a resource can play within an organizationb. Can be used for filtering on the Schedule Board

    c. Often used with Project Service Automation to define generic place holders for needed resources on projects

    To add a Resource Role/Category, go from field service > Resource Scheduling >  click on Resource Roles:

    add below information such as name, I have taken as ‘trainee‘ and other details such as utilization and Billing Type etc and click on save &  close:

    Now you will be able to associate this to a resource.

    One Important Point : We have been talking about Roles & Category alot but on the grounds these two are exactly the same so dont get confused.

  5. Explain differences between organizational units and business units They are very much different. The major difference between them is that a traditional business unit drives the security structure of you dynamics crm however an organizational unit is just a placeholder for categorization  of your business.
    That’s it for this blog, I will see in the last topic of this module in the next blog.

    —————————————————————————————–

MB2-877 Microsoft Dynamics 365 for Field Service Module 1 Topic – Configure bookable resources

This is the 4th blog of this series, before this I have created a blog on the topic “configure products and services pricing”  from Module 1 which you can check here : MB2-877 MICROSOFT DYNAMICS 365 FOR FIELDSERVICE MODULE 1 TOPIC – CONFIGURE PRODUCT AND SERVICE PRICING In this blog we will cover up the topic from the module 1 “Configure bookable resources
  1. Identify Fields for bookable resources Let’s understand what is a bookable resource, well, a bookable resource in Field Service is anything that you’re going to need to carry out a work order.  Now, it could be a user, so an employee of your organization that is actually going to go out in the field and work through something. And it doesn’t necessarily have be a person it could be anything in field service. To create a bookable resource ,from your field service >click on “Resource Scheduling” and then on “Resources”:
  2. below the are main fields that needs defining when creating a bookable resource:       Resource Type – Can be of type User or Contact or Account etc. Skills & Certifications – Resource Skills and achievements Roles & Categories –  Resource’s Roles Working Schedule – Resource’s work routine i,e start & end time. Hourly Rate – Resource’s Charges.   Location Information –  Work start and end location.   Schedule Board Display Options –  Yes/No Territory Information –  Territory a resource belongs to.
  3. you will have to complete all this information here on the different tabs available below such as “project service”, “field service” & Scheduling:
  4. Enable mapping functionality You can enable mapping functionality which is a concept of geo location, making sure that, when a work order is created, that we understand the exact physical location of where that work order is to be executed from a service technician perspective. By default this is Disabled in field service + Project Automation.
  5. To Enable go to from Field Service > Resource Scheduling > Administration and click on Scheduling Parameters:
  6. Change “Connect to Maps” field to “Yes”. Once you do that you will be presented with a warning popup. Click okay and the mapping functionality will be enabled.
  7. Identify entities that are geocoded Out of the box, accounts and work orders are all geo located to ensure that they are physically tied to an actual, mappable address that can be used through like Bing Maps or Google Maps or something similar to that functionality.
  8. To see this open an account and from ribbon navigation click on “Geo Code“:
  9. It will then actually try to map the address given on this account to an actual physical address on the map and give you suggestion. select and click okay and save the account.
  10. Define start and end location for resources  & Identify differences between address types A resources might physically start their day at the office.  So it might be a situation where the technician’s going to come into your office.  Once they come into your office, they’re going to get the all the accessories they need for that particular day, their stack of work orders, and then they’re going to head off into the office.  So with the option of start and end location you will be able to map your routing information based upon where they start their day.  So if they start their day at the office, you know that that’s how you want to work through it.  The other option could be that they’re starting their day from their physical resource address.
  11. To define this – follow step  1 given above for creating a bookable resource and go to “Scheduling” tab:
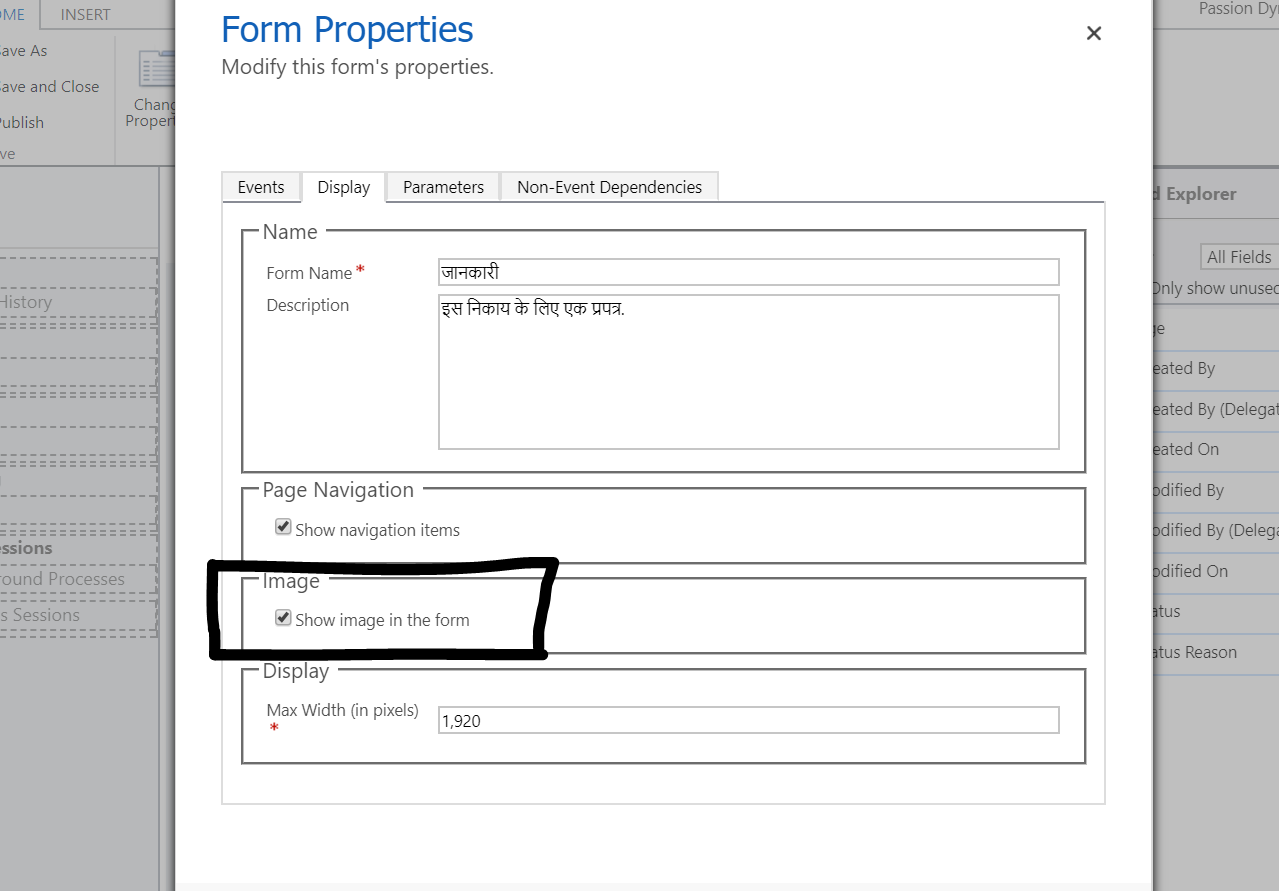
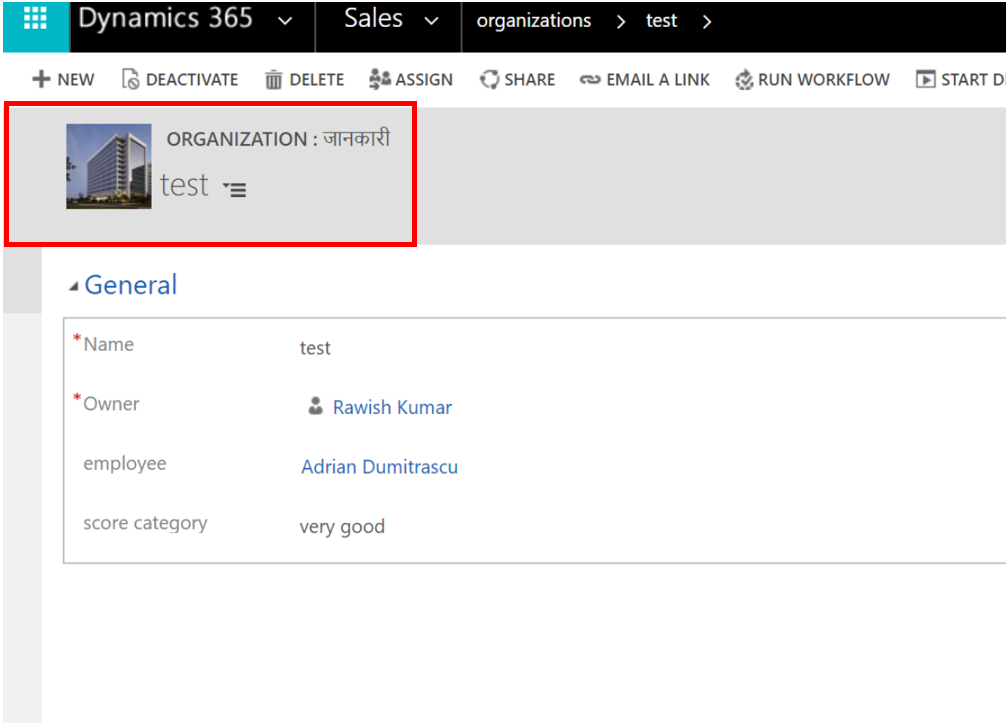
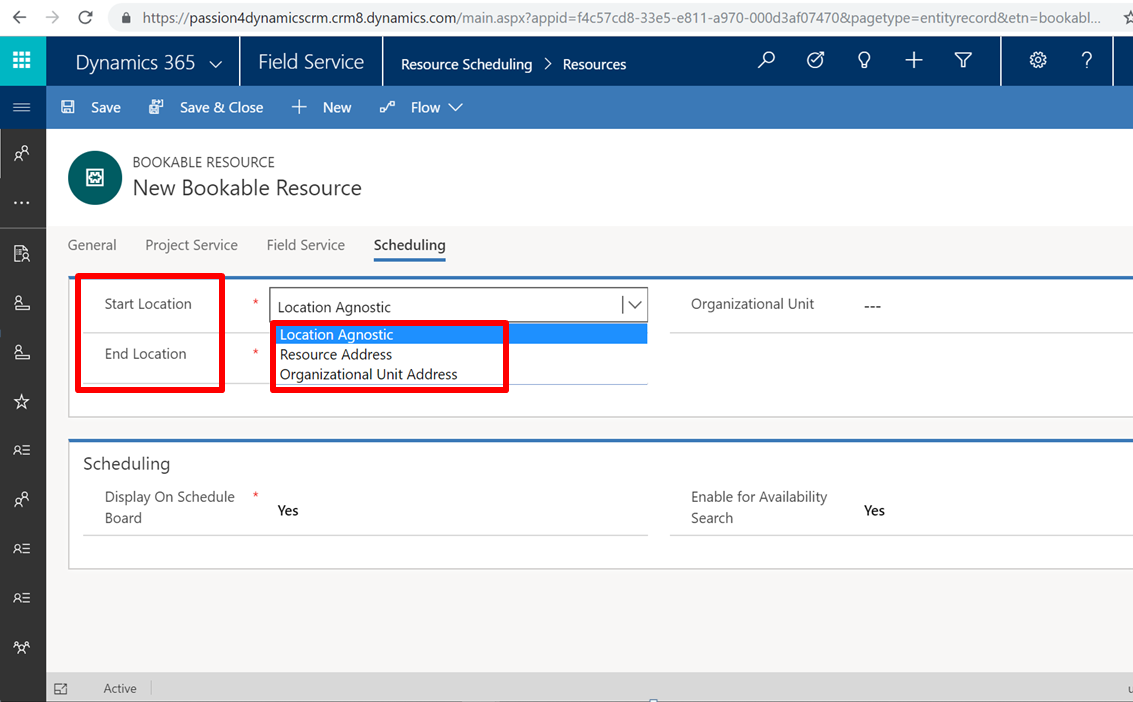
  12. you get couple of option which means as below:
  13.  a. Resource start and end locations are used to help plot a                             resource’s daily route
  14.    b. Start and end locations can be defined as:
    •  Location Agnostic: Does not have a defined address
    • Resource Address: Uses the address defined for the resource
    • Organizational Unit Address: Uses the address defined on the resources organizational unit
  15.   c. Address play a direct role in whether a resource is suggested for           a Work Order in the Schedule Assistant
  16. So, this is it – i will see you in the next blog.

MB2-877 Microsoft Dynamics 365 for Field Service Module 1 Topic – Configure product and service pricing

This is the 3rd blog of this series, before this I have created a blog on the first topic “Perform initial configuration steps”  from Module 1 which you can check here : MB2-877 Microsoft Dynamics 365 for Field Service Module 1 Topic – Perform initial configuration steps

In this blog we will cover up the second Topic from the module 1 “Configure product and service pricing

NOTE : Before we start the module I would strongly suggest you to understand product catalogue in dynamics crm as we will be using price lists, products, unit groups etc alot :   https://docs.microsoft.com/en-us/dynamics365/customer-engagement/sales-enterprise/set-up-product-catalog-walkthrough   and if you have the knowledge already lets begin:


  1. Configure product and service pricing features including minimum charge amount, minimum charge duration, and the flat fee option
    You can add default “Standard” Price List to your Product in field service, however when you think about “Service” you might want to handle its price list slightly different. In Field service to accomplish this “Field Service Price List” has been added to dynamics CRM:
    Once you have configured a price list , you then navigate to “Related” option and click on “Field Service Price List Items”.

    ( Note that My field service is in Unified Interface so don’t get confused, I am intentionally using field service application – Once you have created a dynamics CRM trial for yourself which should include field service module too, you will see the field service app which you can access :

    So, Once your default price list – navigate to the related Field service price list and click on “Add new field service price list”

    If you see above I have set Flat Fee, Min Charge Amount & Minimum Charge Duration. Let’s understand what these options are:

    Flat Fee – If enabled then the pricing of this item will be not be multiplied by the quantity  and also Let’s you decide if a fixed fee for this service applies.

    Minimum Charge Duration–  If this field has a value , The Min charge will first apply to the minimum duration and beyond the min duration the standard charges will apply in short it will make some amount of time service free.

    Minimum Charge Amount –  As name suggest these are minimum charges for this service which correlates to the min charge duration. 

    lets do some math, assume my training per hour charge is 20,000 INR.
    now if  I apply above field service price list. The requirement is for 5 hours of training. then the math goes like this:

    Minimum Charge Duration defined by me is 1 hour. The requirement is 5 hour which means the bill will be for 4 hour which is 4*20,000= 80,000 INR then on this my minimum charge amount will be added which is 10,000 INR. So the final bill will be 90,000 INR.


  2. Add Products & Services to Incidents

    To this, simply navigate to Field service > Incident Type and add incident type. Once you do that; Now When you creating a work order and select incident there – it creates an incident for you which will have the product or service associated. so on a work order you can add product or services via incident.

  3. Determine when a Product has default Price List and a work order price list.

    Here are some quick points to cover up this topic. As we know Price List can be associated to following entities:

    • Account
    • Work Order
    • Agreement
    • product or service

    There there can be a clash in which price list to be used when they combine such as what if work order has a price list & also associated product has a price list too, in that scenario we’ll consider below:

    a. The Work Order Price List is used if a product has a different default price list than the Work Order

    b. The price of the product will come from the list price on the product if an Item is not on the Work Order Price List


  4. Associate Products & Services to Price Lists.

    Its Quiet easy and straight forward to associated a product or service to a price list. To do this go from Field service navigation > Field service navigation then click on an existing price list or create new as needed.


    Open an existing price list or create new one and click on “Price List Items” & click on “+Add New Price List Item”:


    Add the Product to it in my case I have added as “Exam preparation” and its Unit in “Hour” which is all defined on the product level and click on Save and Close.


  5. Define tax code.
    You can define tax code within your dynamics CRM field service. Remember you can have different scenarios/requirement to have different – different tax codes.

    To define a tax code, click on the dynamics 365 navigation from within field service app and click on field service setting and then on “Tax Codes“:

    Click on “Add new tax code”:

    Few important points on Tax Codes:  
    a. Used to define how tax on Work Order charged
    b. Tax options for products,
    agreements, and services
    c. Can be individually defined
    for each taxable item
    d. A tax code can contain
    multiple child tax codes and hence the total tax is defined by the sum of all the children.


MB2-877 Microsoft Dynamics 365 for Field Service Module 1 Topic – Perform initial configuration steps

Before this blog – I have provided an overview about this exam which you can see here: MB2-877 Microsoft Dynamics 365 for Field Service Exam Overview

In this blog we will be focusing on the module 1 “Set up and configure Field Service” and first  topic “Perform initial configuration steps”:

2

  1. Identify key security roles.

    A user in Field Service is a member of your organization who will use a Field Service license. Security roles define which entities a user can view as well as how they can interact with those entities. Field security profiles define which fields a user can see. As an example, a user may have permission to see accounts but not to see specific fields for an account. Field Service comes with four predefined security roles and field security profiles:

    • Field Service Administrator: Generally assigned to key people within the organization who need access to the Administration tile. Global access to all Field Service entities.
    • Field Service Dispatcher: Generally people in the organization who are responsible for scheduling and need to manage resources and work orders.
    • Field Service Resource: Generally people within the organization who will access Field Service from a mobile device.
    • Field Service Inventory Purchase: Generally people within the organization who are responsible for inventory, purchase orders, RMAs, and RTVs.
    • Field Service App Access: these would be the people who really only need to have access to the Field Service mobile application.  So they don’t necessarily need the full gamut of functionality from a resource standpoint, but they do need to be able to login to the application, see what work orders have been assigned to them, and carry out some basic day-to-day functionality.
  2. Identify resource scheduling options.

    Resource Scheduling is all about understanding who and what resources you have available to be able to work through these different projects or service tickets that need to be done.  So as part of the resource scheduling scenario, this gives you kind of a one-stop shop or a single point of contact to be able to go out and manage some of the different shared scheduling components in the application.

    This can be divided into 3 categories:

    In short to understand this, You define resources , resource roles & skills etc and then you can schedule work orders using the Schedule Board. Also you have some Settings that you can do for example setting up Orgnizational Units i,e you may have services that you provide over different countries so you can create different organizational units such as one for India, One for UK etc.

  3. Identify entities that can be customized with administrative settings.

    This allows an administrator to customise entities as per business field service requirement. Below entities can be included in this process :

    • Characteristics
    • Territories
    • Priorities
    • Warehouses
    • Postal Codes
    • Products
    • Bookable Resources
    • Price Lists
    • Time Groups
    • Payment Terms
    • Incident Types
    • Tax Codes
    • Booking Statuses
    • Service Task Types
    • Booking Rules
  4. Identify Product & Services Categories. Before Understand the Product Categories, lets understand what is a Product and a Service.
    • Products are anything the company sells
    • Services are products that are designated as a service the company provides
    • Can be added manually to a Work Order when created
    • Can be added automatically to a Work Order from an associated Incident Type
    • May be marked as “used” billed to a client or left as “estimated” on a Work OrderField Service related products can be defined as any of the following:
      • Inventory: Products sold and deducted from inventory
      • Non-Inventory: Products sold but not tracked in inventory
      • Services: Sold on time and materials basis & Price and costs are hourly rates

                      Duration of Service:

      • Manually Entered on mobile by field agent
      • Derived from elapsed time between work order schedule statuses


      In the next blog, we will go through the topic 2 from module 1 – Configure product and service pricing

Get Most Recent Created On Record from Retrieved Entity Collection In Plugin

Sometimes, you may have a requirement to get the most recently created on record from the entity collection you have retrieved.

Instead of playing around a lot with coding and .net stuff, Dynamics CRM fetch XML and QueryExpression provides a way to sort records Ascending or descending.

Therefore, While retrieving records in FetchXML, do this :

<entity name='entityname'>
 <attribute name='atrributename1' /> 
   <attribute name='atrributename2' />    
    <attribute name ='attributename3' />                       
      <order attribute='createdon' descending='true' /> 
     <filter type='and'>                                  
     <condition attribute='statecode' operator='eq' value='0' />
   </filter>
</entity>

Or in Query Expression:

QueryExpression qe = new QueryExpression(entityName);
FilterExpression fe = new FilterExpression();
qe.ColumnSet = new ColumnSet(true);
qe.Orders.Add(new OrderExpression(columnname, ordertype)); 
service.RetrieveMulti ple(qe);


when Execute them , you will get the desired record on the top which can be access by simply by doing retrievedResult[0] or :

firstRecord= retrievedResult.Entities.First(); //first method.

firstrecord

I hope this helps!

cheers!


Tips For Passing MB2-715 Certification

I have recently passed MB2-715 Microsoft Dynamics 365 customer engagement Online Deployment Certification. It was really fun preparing for this certification and I achieved a good amount of learning. Therefore I would like give my inputs/Tips on this certification to whoever wants to complete it.


What This Certification Is About?

The purpose of this certification is to understand what it takes to plan, prepare & deploy Microsoft Dynamics CRM Online  365 for your client.

From choosing the right plan , number of license to managing multiple instances. All in All this is for people who would like to Admin a dynamics 365 CRM Online.


What will you get out of it?

Obviously a certification, however more importantly full knowledge of dynamics crm 365 online administration. Most of us are typical CRM developers, we hardly get to see how the CRM is being managed, pricing, licensing etc. This certification is a great opportunity to expand your horizon.


How to Schedule the exam ?

Well, you have to go to learning page of microsoft dynamics crm and explore the certification or directly : https://www.microsoft.com/en-us/learning/exam-mb2-715.aspx
it will ask you to chose the date , nearest center where you give exam or even online if you wish to. Finally once you have paid the amount, you are all set.!

Finally, How did I prepare and pass the exam?

I actually selected multiple sources from where i can learn which i would suggest you to take depending on your convenience.


That’s all from me. I wish you all the very best for the exam. Please let me know how it goes!

cheers!


Know if an email has been replied or worked upon

This is very common question that i get on community or on other forums on how to identify if an email has been replied or worked upon by a user.

Well the easiest approach to tackle this is that there is a field on emails as parentactivityid  which can be used and put on the views, this field basically will contain the email on which you have replied.

So if this field contains data, it means someone has replied on this email.

for example , see below :

Capture

  1. My first email doesn’t contain anything in the parentactivityid because its a fresh sent email.
  2. My second is actually the email which i have sent above – it has the parent activity id as the first email.
  3. My third email is a reply on the previous email received, hence it has that in the parentactivity id column.
  4. My last email is the received email which has the parentactivity id as the email which i sent previously.

Hence, the logic should be like.

1.)

Email direction = incoming

parentactivityid = contains email

Action = you have to reply to this email.

2.)

Email direction = outgoing

parentactivityid = contains email 

Action = it means it has been replied.

3.)

Email direction = incoming

parentactivityid = doesn't not contains emails

Action = you have to work on it

4.)

Email direction = outbound 

parentactivityid = doesn't not contain email

Action = its a fresh email.

I hope it makes sense.

Cheers!

How to enable Image for an entity in Microsoft Dynamics CRM

In this blog i am going to discuss about “Image” type attribute/field in CRM and how this can be used to enable image for an entity on the form like below:

8


Lets see how we can achieve this:

  1. Navigate to Customization>Customize the system>Entities & navigate to the entity for which you want to enable image> go to fields > create a new field as below:2
    Give it a name and select Datatype as image – as soon as you select datatype , you will notice that Schema of the field is set to “entityimage”. Save & close
  2. Now 2nd step is to navigate to entity definition as below:3
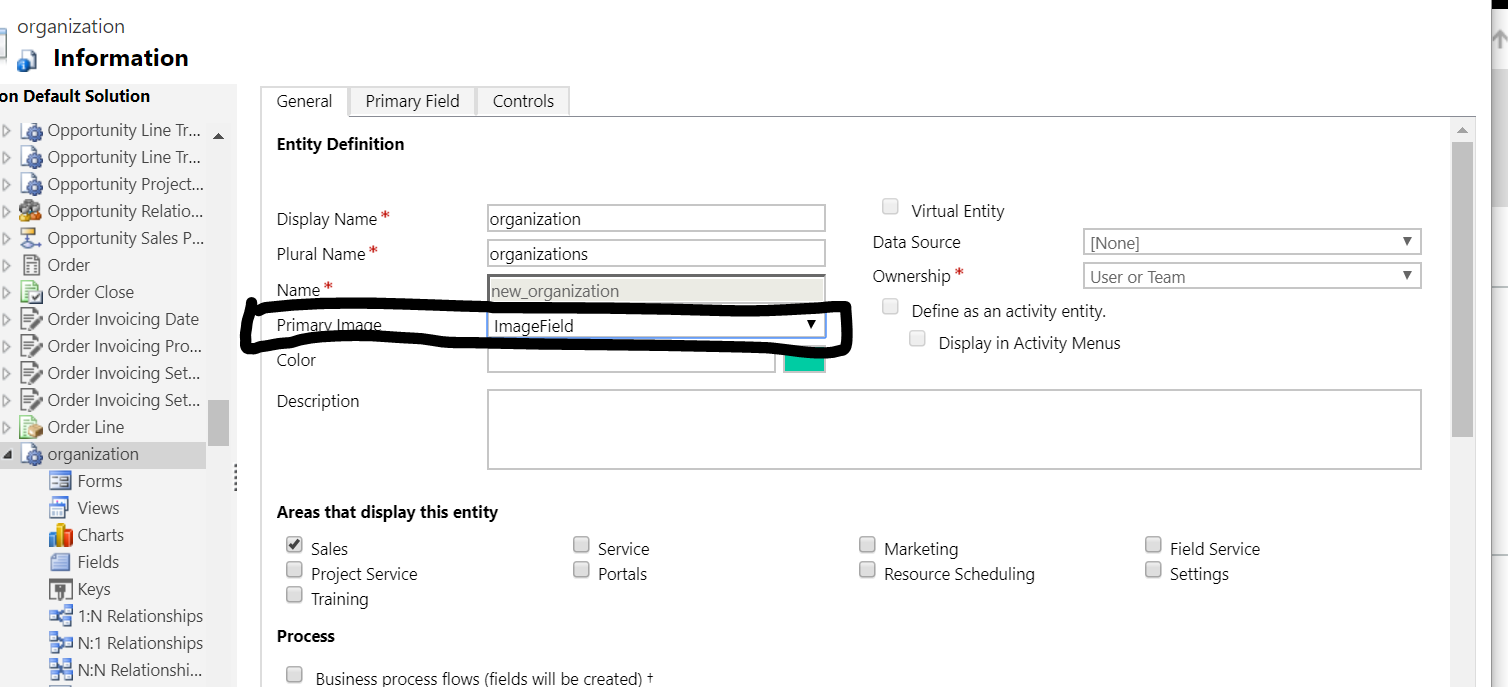
In the property ” Primary Image” – you will see the name has come , if not select it from the dropdown.
  3. Final Step is to make form changes, navigate to the form and open form editor and click on “form properties” , select the below option:4
  4. Lastly save and close the form and publish all customizations. Navigate to the entity record , you will notice an image icon is now appearing on the form.
    5
  5. click on the image and browse the image you want to set:6
  6. After Selecting the Image click okay and you will see image is appearing now:7


I hope this helps!


cheers!

Learn Microsoft Dynamics CRM – Basics, Customization & Configuration

aads-education-offers-microsoft-dynamics-crm-training-2-638

In office, while i am blogging or in dynamics community ; i always get this question that how a fresher can start learning CRM. Well let me tell you learning CRM is very easy since it is a Microsoft technology in which we have been living & using from our outlook to windows.

Well on internet ; information is pretty much distributed and in bits & pieces but i have collected the below information in sequence on how you  can you start from zero and go till 100 🙂

  1. First things first you should know what is CRM , well according to microsoft definition is :
             crm definition.PNG

    “CRM solutions streamline processes and increase profitability in your sales, marketing, and service divisions. A strong CRM solution is a multifaceted platform where everything crucial to developing, improving, and retaining your customer relationships is stored. Without the support of an integrated CRM solution, you may miss growth opportunities and lose revenue because you’re not maximizing your business relationships.”

  2. Next i would suggest you to see above everything in action :  https://www.chalkstreet.com/microsoft-dynamics-crm-tutorial    ,  https://mva.microsoft.com/en-us/training-courses/introduction-to-microsoft-dynamics-365-17593?l=J6OdOYtqD_906312570
  3. Once you have done this – i think you will be pretty much comfortable having your own CRM environment to get your hands dirty in, therefore go ahead and get your trial :https://trials.dynamics.com/
  4. Time to know how CRM can be available to you(to be technical “deployment options available in CRM”) :  https://www.powerobjects.com/2015/10/21/upgrading-crm-crm-online-vs-on-premises-finding-the-best-fit-for-your-organization/
  5. Once you understood all above, my suggestion for you is to now understand the core concepts which makes the whole CRM :

https://www.tutorialspoint.com/microsoft_crm/microsoft_crm_overview.htm

In this tutorial you will learn about what are the core components of  CRM like Entities , Fields, Forms, Business process flows etc. This blog also pretty much explains how you can customize the crm.

6. Now go though this blog and do same in your trial version :

https://crmbook.powerobjects.com/system-administration/customization/

i will talk about customizing, fields, forms , entities , charts, dashboards,solutions etc.

7. Security model – Now this is a major topic which you must understand very well without which it will be very difficult for you to master dynamics crm else you will be missing out on very small/minor things during your career

https://www.youtube.com/watch?v=_vfp3C11a3Mhttps://www.youtube.com/watch?v=An-VgsHEp9A

8. Now , one of the main features of crm is “Processes” , processes are the main component in CRM which helps you to perform actions based on your needs :

a. business rules :  http://www.inogic.com/blog/2016/12/business-rules-dynamics-365/

b. Workflows :  https://crmbook.powerobjects.com/system-administration/processes/workflows/

c.Plugins :  https://crmbook.powerobjects.com/extending-crm/plug-in-development-and-workflow-extensions/plug-ins/developing-a-plug-in/

9.Apart from it most of the stuff you would do through JavaScript which you coudnt  using business rule, mainly javascript is used to perform complex logics else i always recommend you to use business rules  :  https://www.youtube.com/watch?v=wxMB-cIQPUw


if you go through all of the above carefully , you will be in a position to work on dynamics crm confidently.

Please leave your comment if i have missed out anything major or you have any question, need guidance on any of the topics above.

happy crm learning, cheers!